Ramps 1.6 Wiring Diagram
Anyway, that means that how to set it up is different than a regular ramps 1.4, meaning that you need to adjust a few things if you are using a a4498 or a drv8825. I have a cooling fan (12 v) for part cooling.
Ramps 1 6 Wiring Diagram Search Best 4K Wallpapers
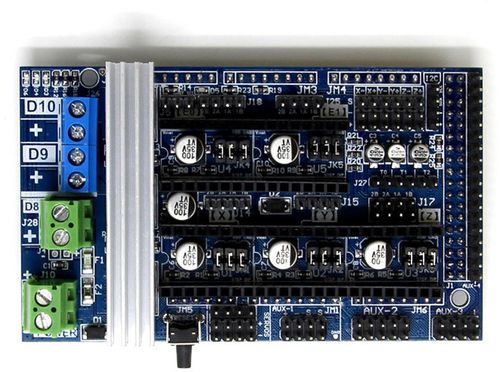
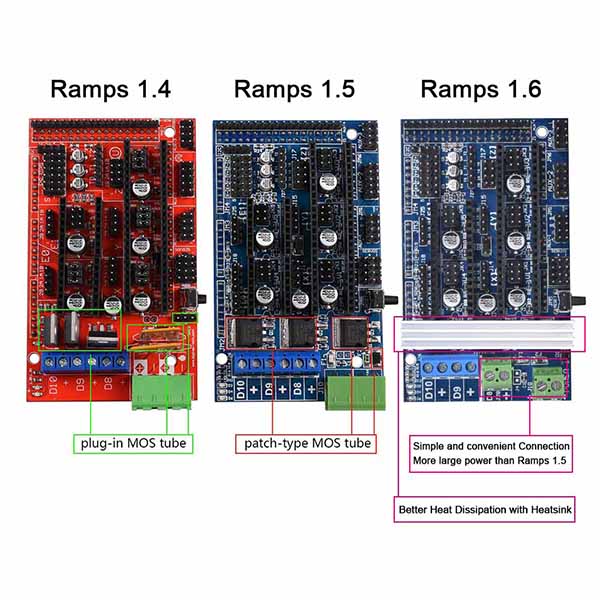
It replaces the original green power connector with a pair of screw terminals, adds a larger heatsink over the mosfets, and has a larger bed mosfet.

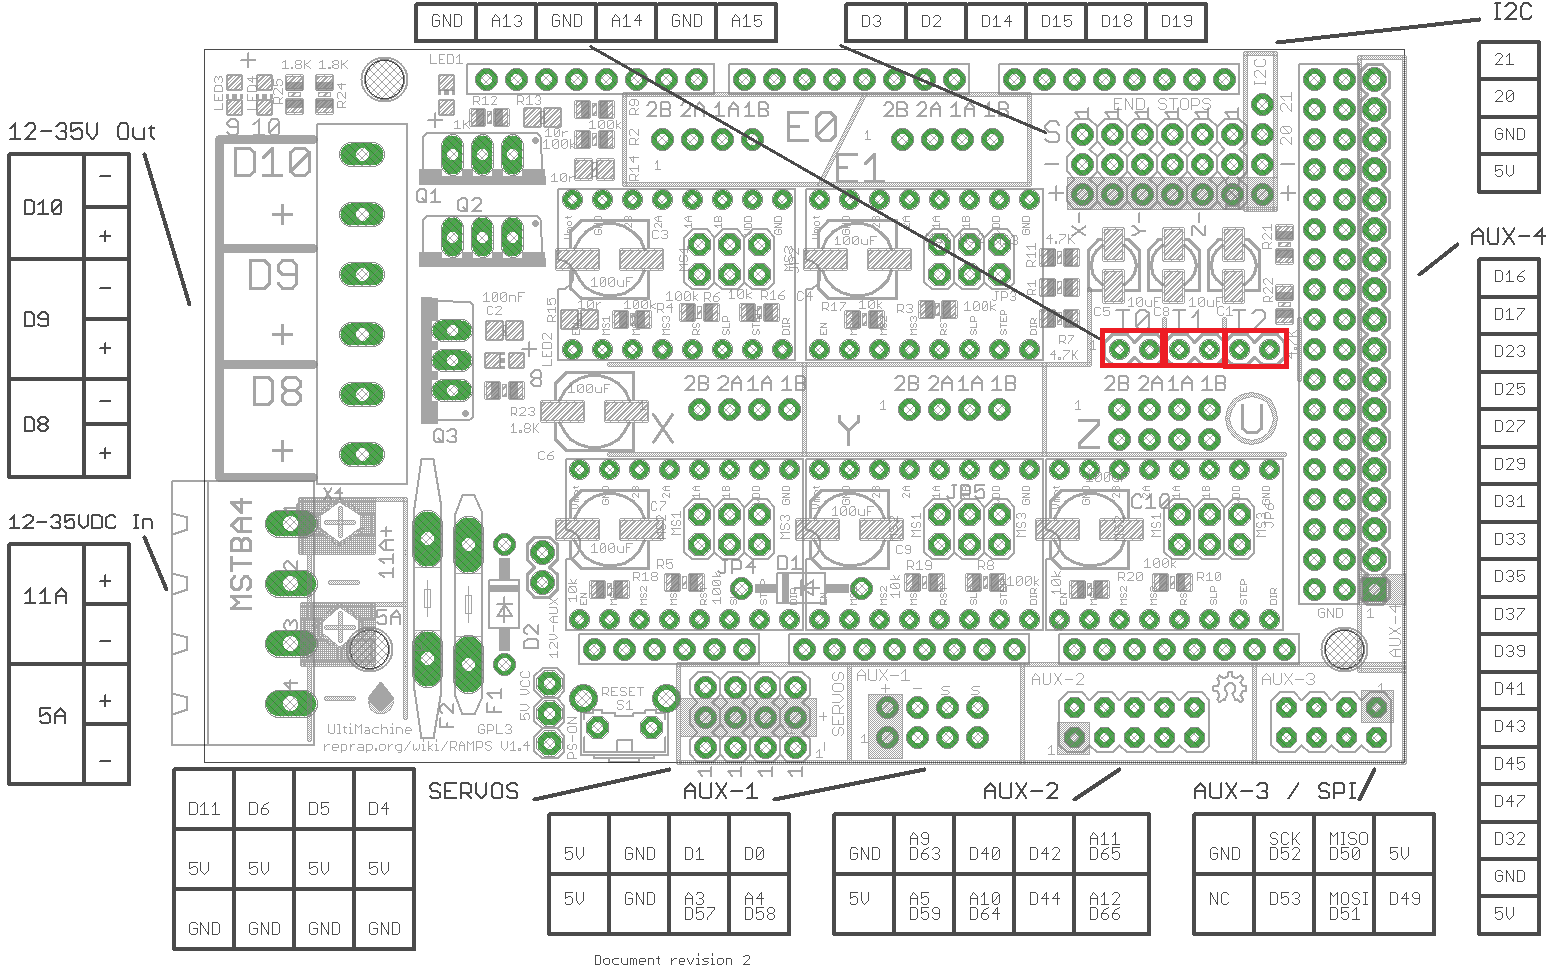
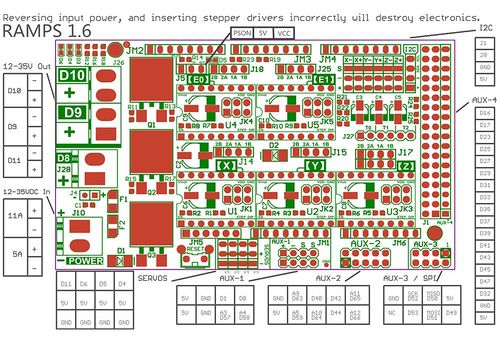
Ramps 1.6 wiring diagram. The ramps 1.6 is the second ramps iteration released by biqu/bigtreetech. Ramps shield v1 6 micro robotics 1 4 arduino with stepper motors mega twinteeth wiring the electronics electrical diagrams for 2560 reprap ramps1 printer circuit. The markings on the diagram 11a and 5a, refer to the number of amps or current each set of components require.
The ramps 1.6 is the second ramps iteration released by biqu/bigtreetech. The ramps 1.6 is the second ramps iteration released by biqu/bigtreetech. Reprap arduino mega pololu shield versions ramps 1.5 wiring diagram
It replaces the original green power connector with a pair of screw terminals, adds a larger heatsink over the mosfets, and has a larger bed mosfet. Strip the end of the green wire, and screw that into one of the terminals with a black wire. The ramps 1.6 is the second ramps iteration released by bigtreetech.
I was using a relay, and i have had to run my. Wiring 3d printer ramps 1.4: In ramps 1.4, i had it connected to the pins between the power inputs and the x stepper driver on the board.
Ramps 1.4 is probably the most widely used electronics for reprap machines as of march 2014. Ramps1.4 + atx power wiring. Ramps 1 6 wiring diagram.
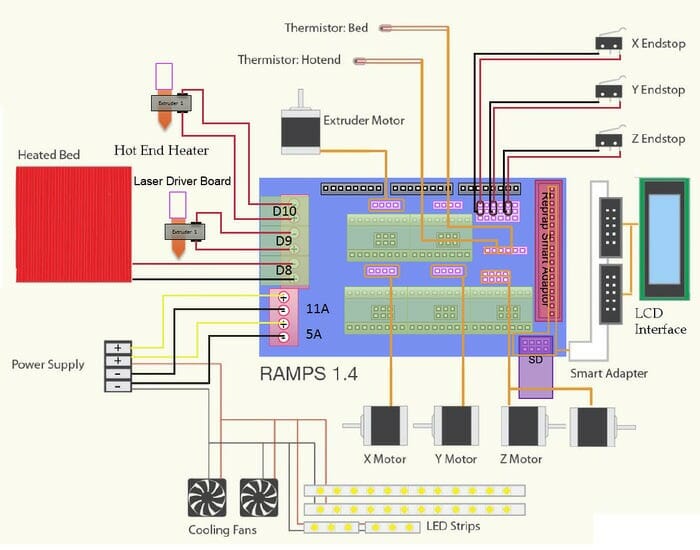
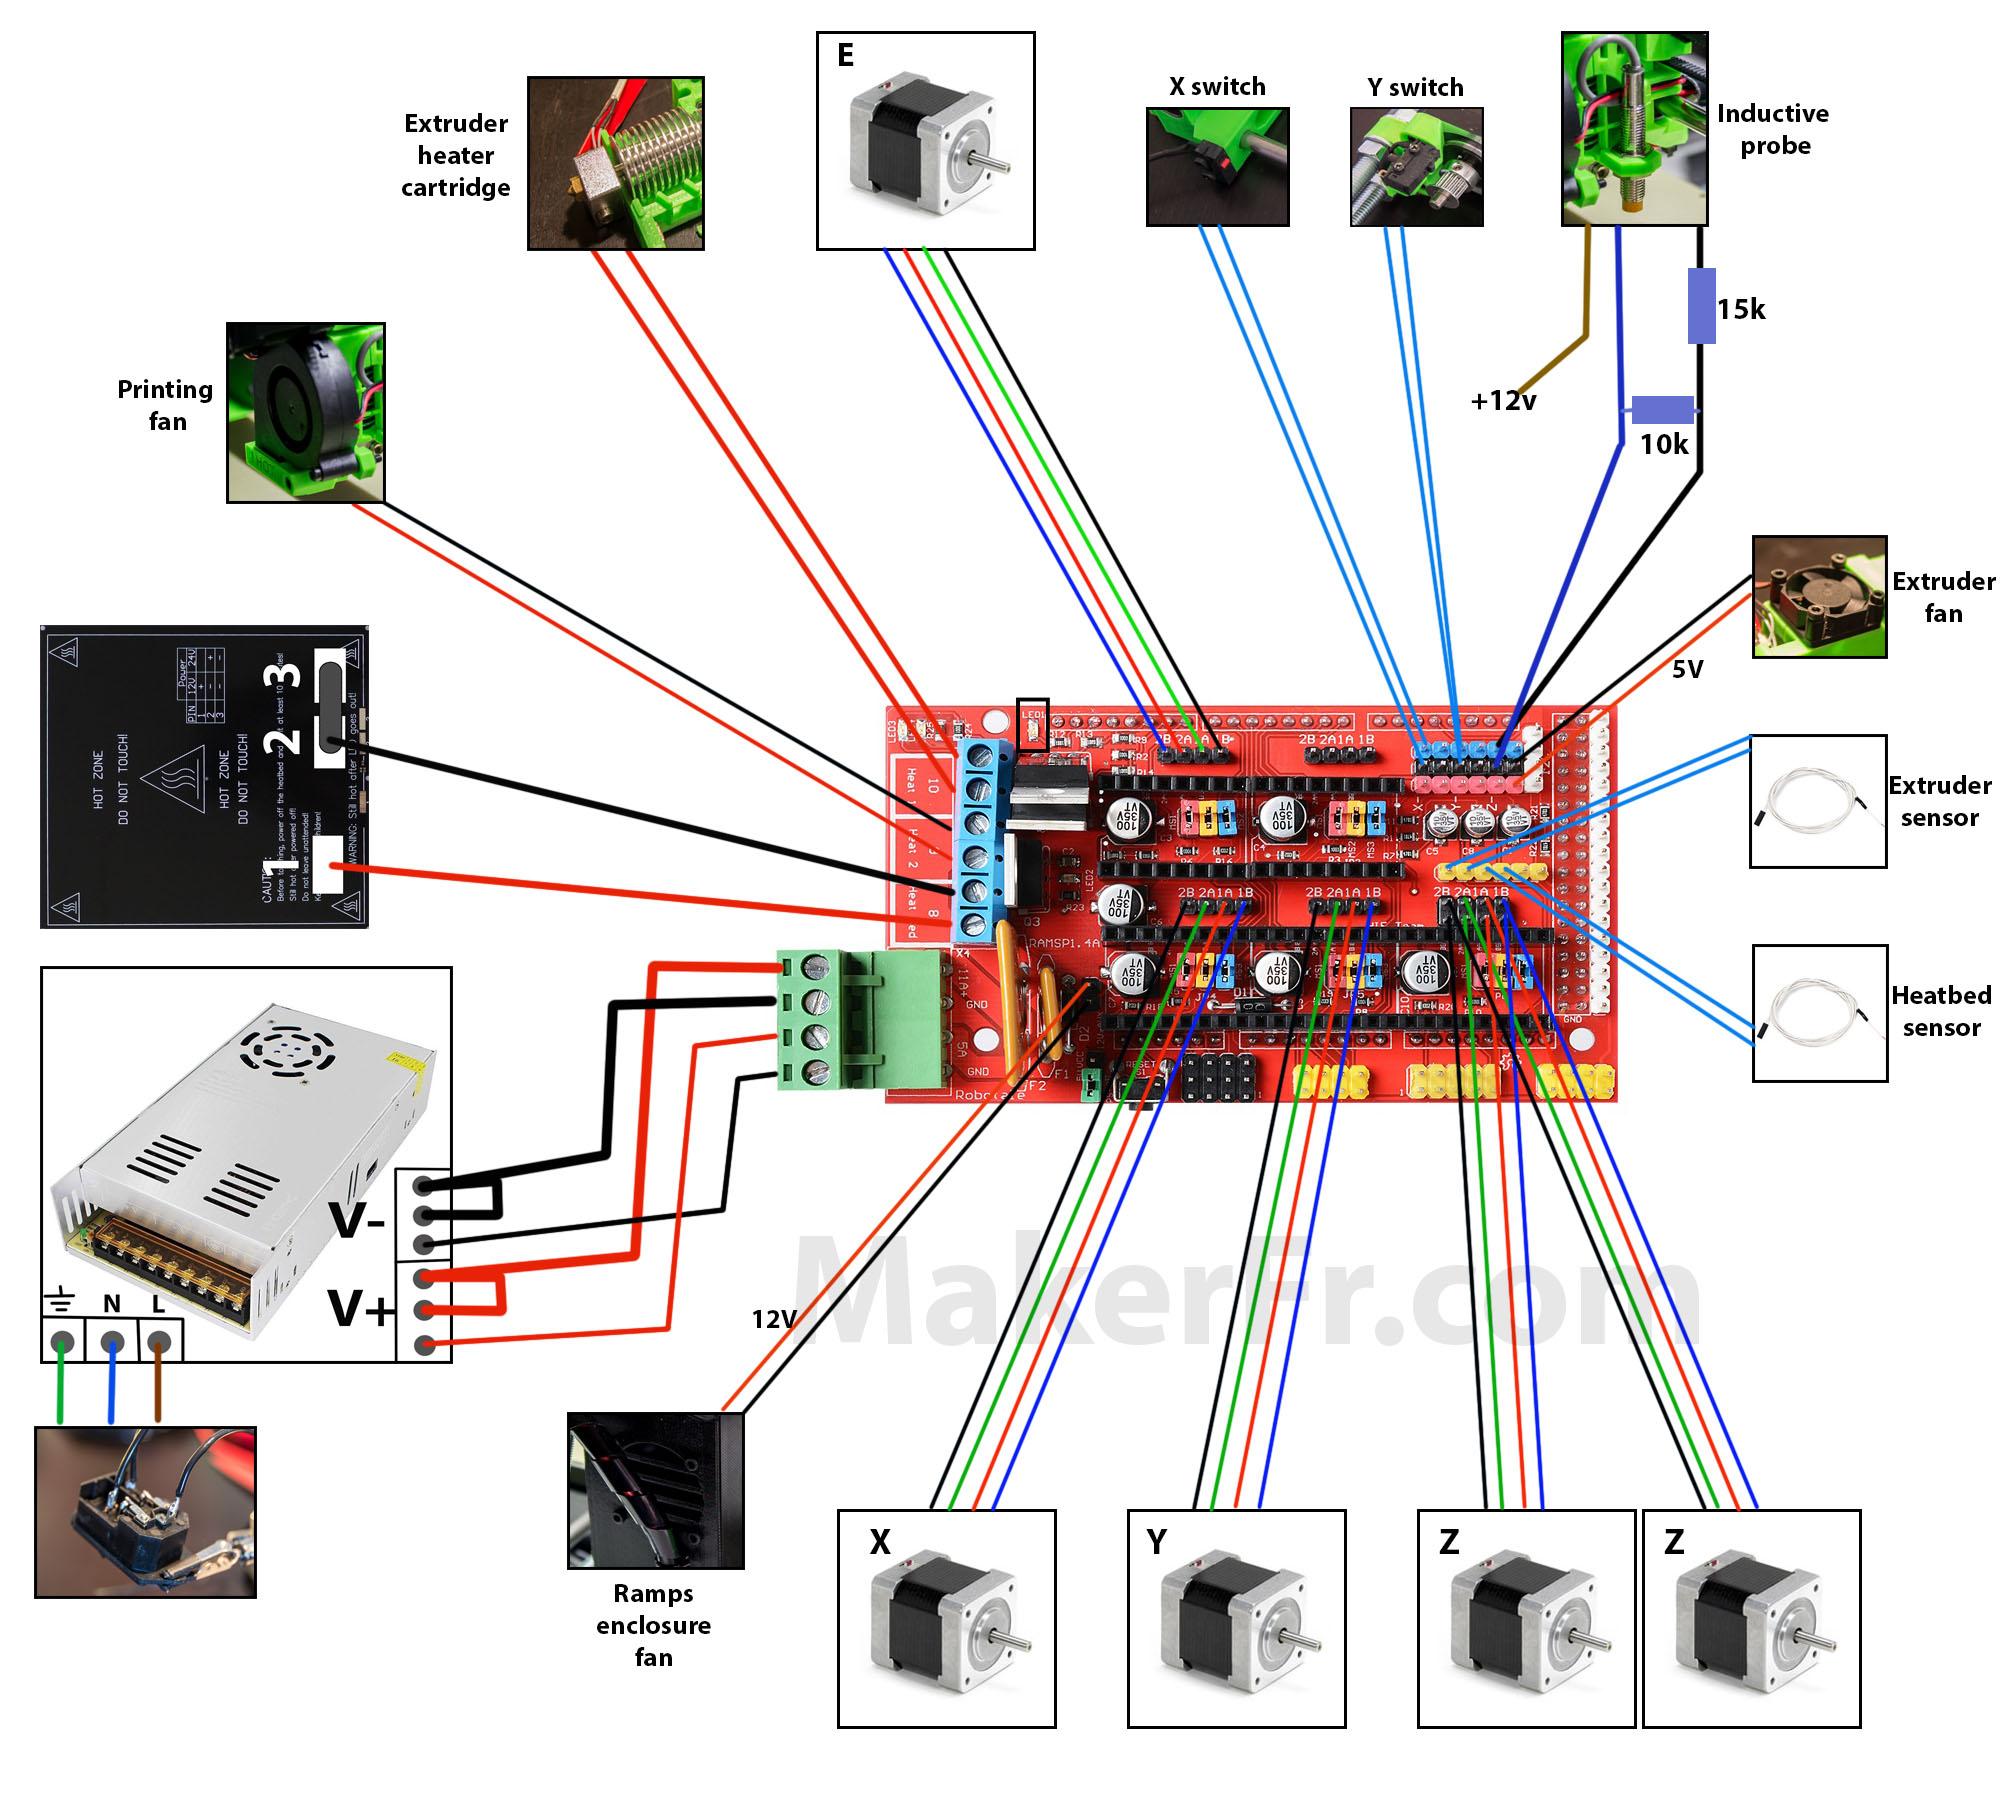
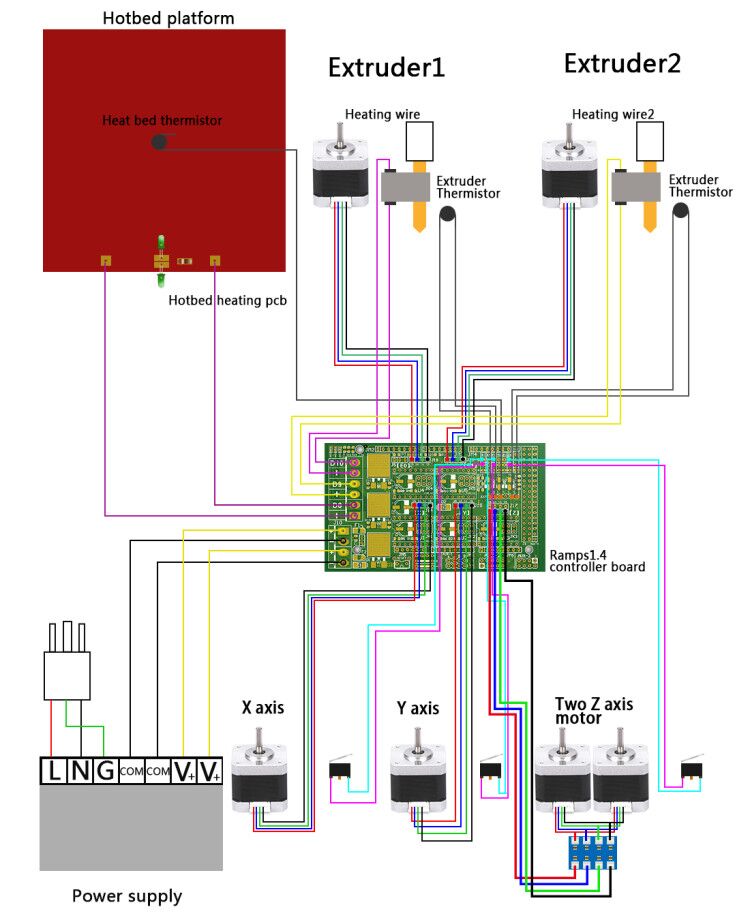
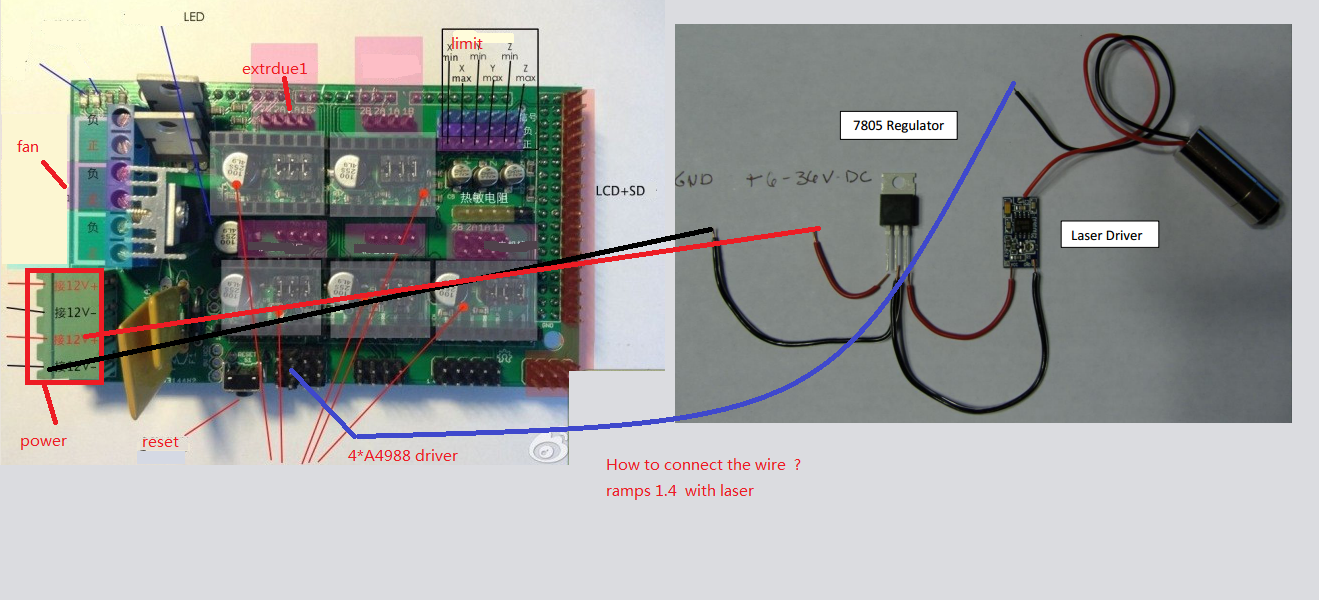
In this case, it's safe because 5v of servo connector and vcc of ramps1.4 are seperated. I've had some requests about how to wire a 3d printer and more specifically, how i wired my laminated prusa i3 printer.in this instructable i will walk through all the components and steps required to setup a 3d printer using the most commonly used. Now i did get two tmc2130's, but i also got two drv8825's for the z and extruder.
Ramps1.4 + external (additional) 5v power wiring. It consists of a ramps 1.4 shield, an arduino mega 2560 board (or a clone), and a max of five pololu stepper drivers. Also, the positions of the d1 and d2 diodes have been swapped.
So i am running ramps on my new mp3dp i made. Pcb ramps 1.6 github repository. This schematic give you more data on all the pin out and also on the optional headers.
Ramps 1.5 board reprap arduino mega pololu shield which improve the heatbed wattage to 110w and a total watts about 200w. Download files and build them with your 3d printer, laser cutter, or cnc. Strip the ends of 2 yellow (12v), and 2 black (ground) wires from the atx, and screw them into the ramps terminal plug.
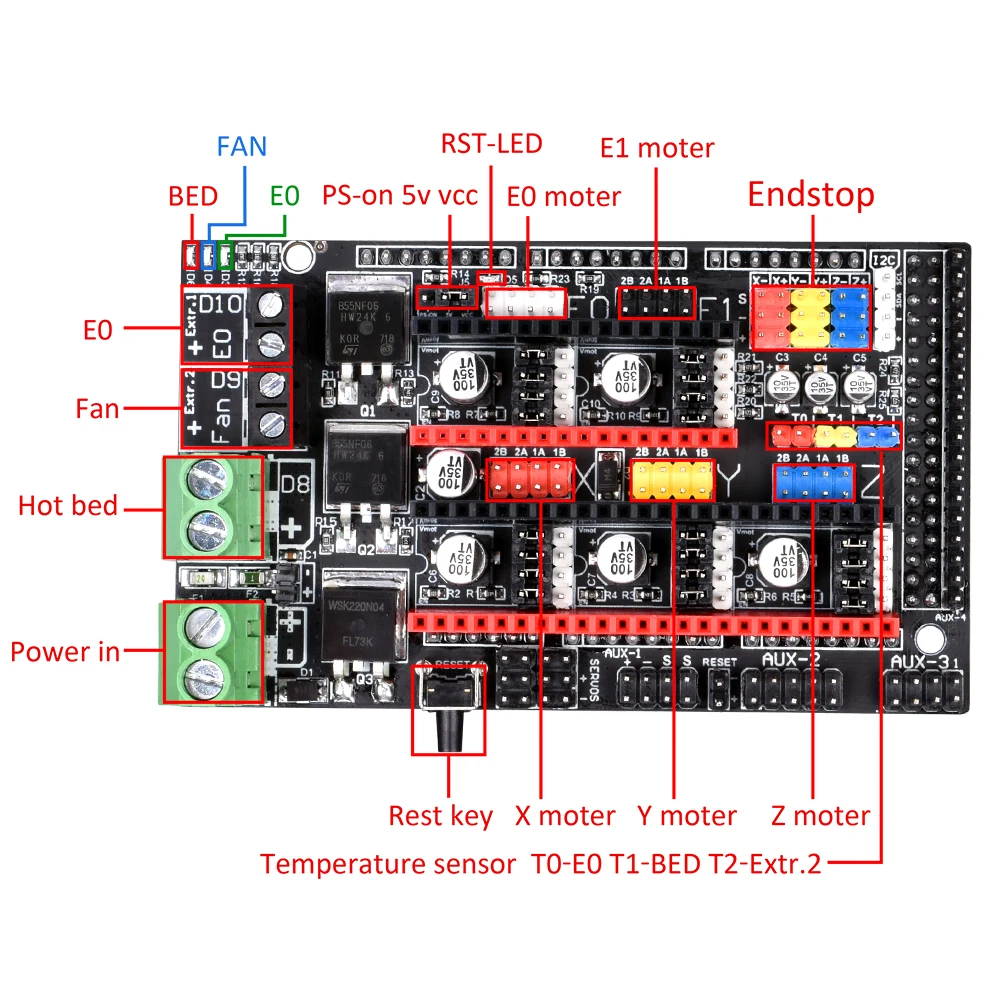
Ramps is short for reprap arduino mega pololu shield, it is mainly designed for the purpose of using pololu stepper driven board (similar to 4988 driven board). The ramps board has + marked next to the terminals that should be connected to the 12v wires. In this case, 12v from atx power is supplied to 1117 regulator on arduino through diode d1 on ramps1.4.
※ do not use jumper between vcc and 5v in this case. Or do i combine them and connect them to their polarity respectively? It replaces the original green power connector with a pair of screw terminals, adds a larger heatsink over the mosfets, and has a larger bed mosfet.
The ramps 1.6 has only 1 pair of power inputs. Reprap arduino mega pololu shield arduino mega based modular reprap electronics. I ordered a ramps 1.6+ thinking higher is better, turns out the ramps 1.6+ is made for a tmc2130.
The 5v line from j5 through to the 5v pin in the servo plugs are shorted to gnd. It is the same you will find on the official reprap wiki. Some third party versions of this board have a design flaw.
It replaces the original green power connector with a pair of screw terminals, adds a larger heatsink over the mosfets, and has a larger bed mosfet. Which pair from the psu do i connect to the board? Thingiverse is a universe of things.
Old marlin v1 firmware firmware provided by designer. The 11a terminal is used to power a heated build platform, and the 5a terminal is used to power the ramps board, stepper motors and extruder. This is a simple tutorial on how to install either or both a4988 or drv8825 on the ramps 1.6 and configure the marlin firmware for 2.0.x.one time tips, you c.
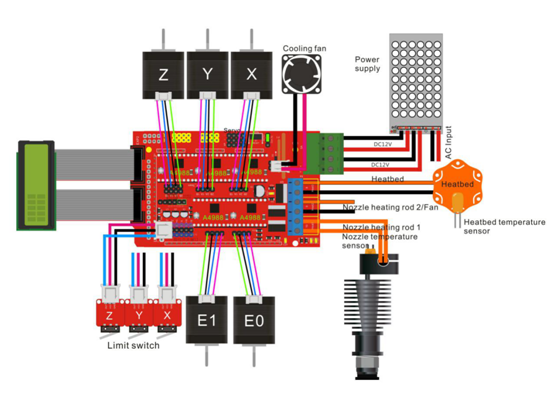
Ramps can only work when connected to its mother board mega 2560 and 4988/drv8825. It can control up to 5 stepper motors with 1/16 stepping Wiring of electronic components to ramps 1 4 arduino shield scientific diagram.

Ramps 1.6 Wiring Diagram For Your Needs
RAMPS 1.6 RepRap
Ramps 1.4 / Ramps 1.6 para Impressora 3D Acelera3D
Biqu Ramps 1.6 Plus Pcb Control Board 3d Printer Electronic Kit Upgrade Base On Ramps 1.6 1.5 1
RAMPS 1.6 RepRap
[RK_2290] Wiring Ramps 1 4 Download Diagram
Multi extrudeur A8 Forum pour les imprimantes 3D et l'impression 3D
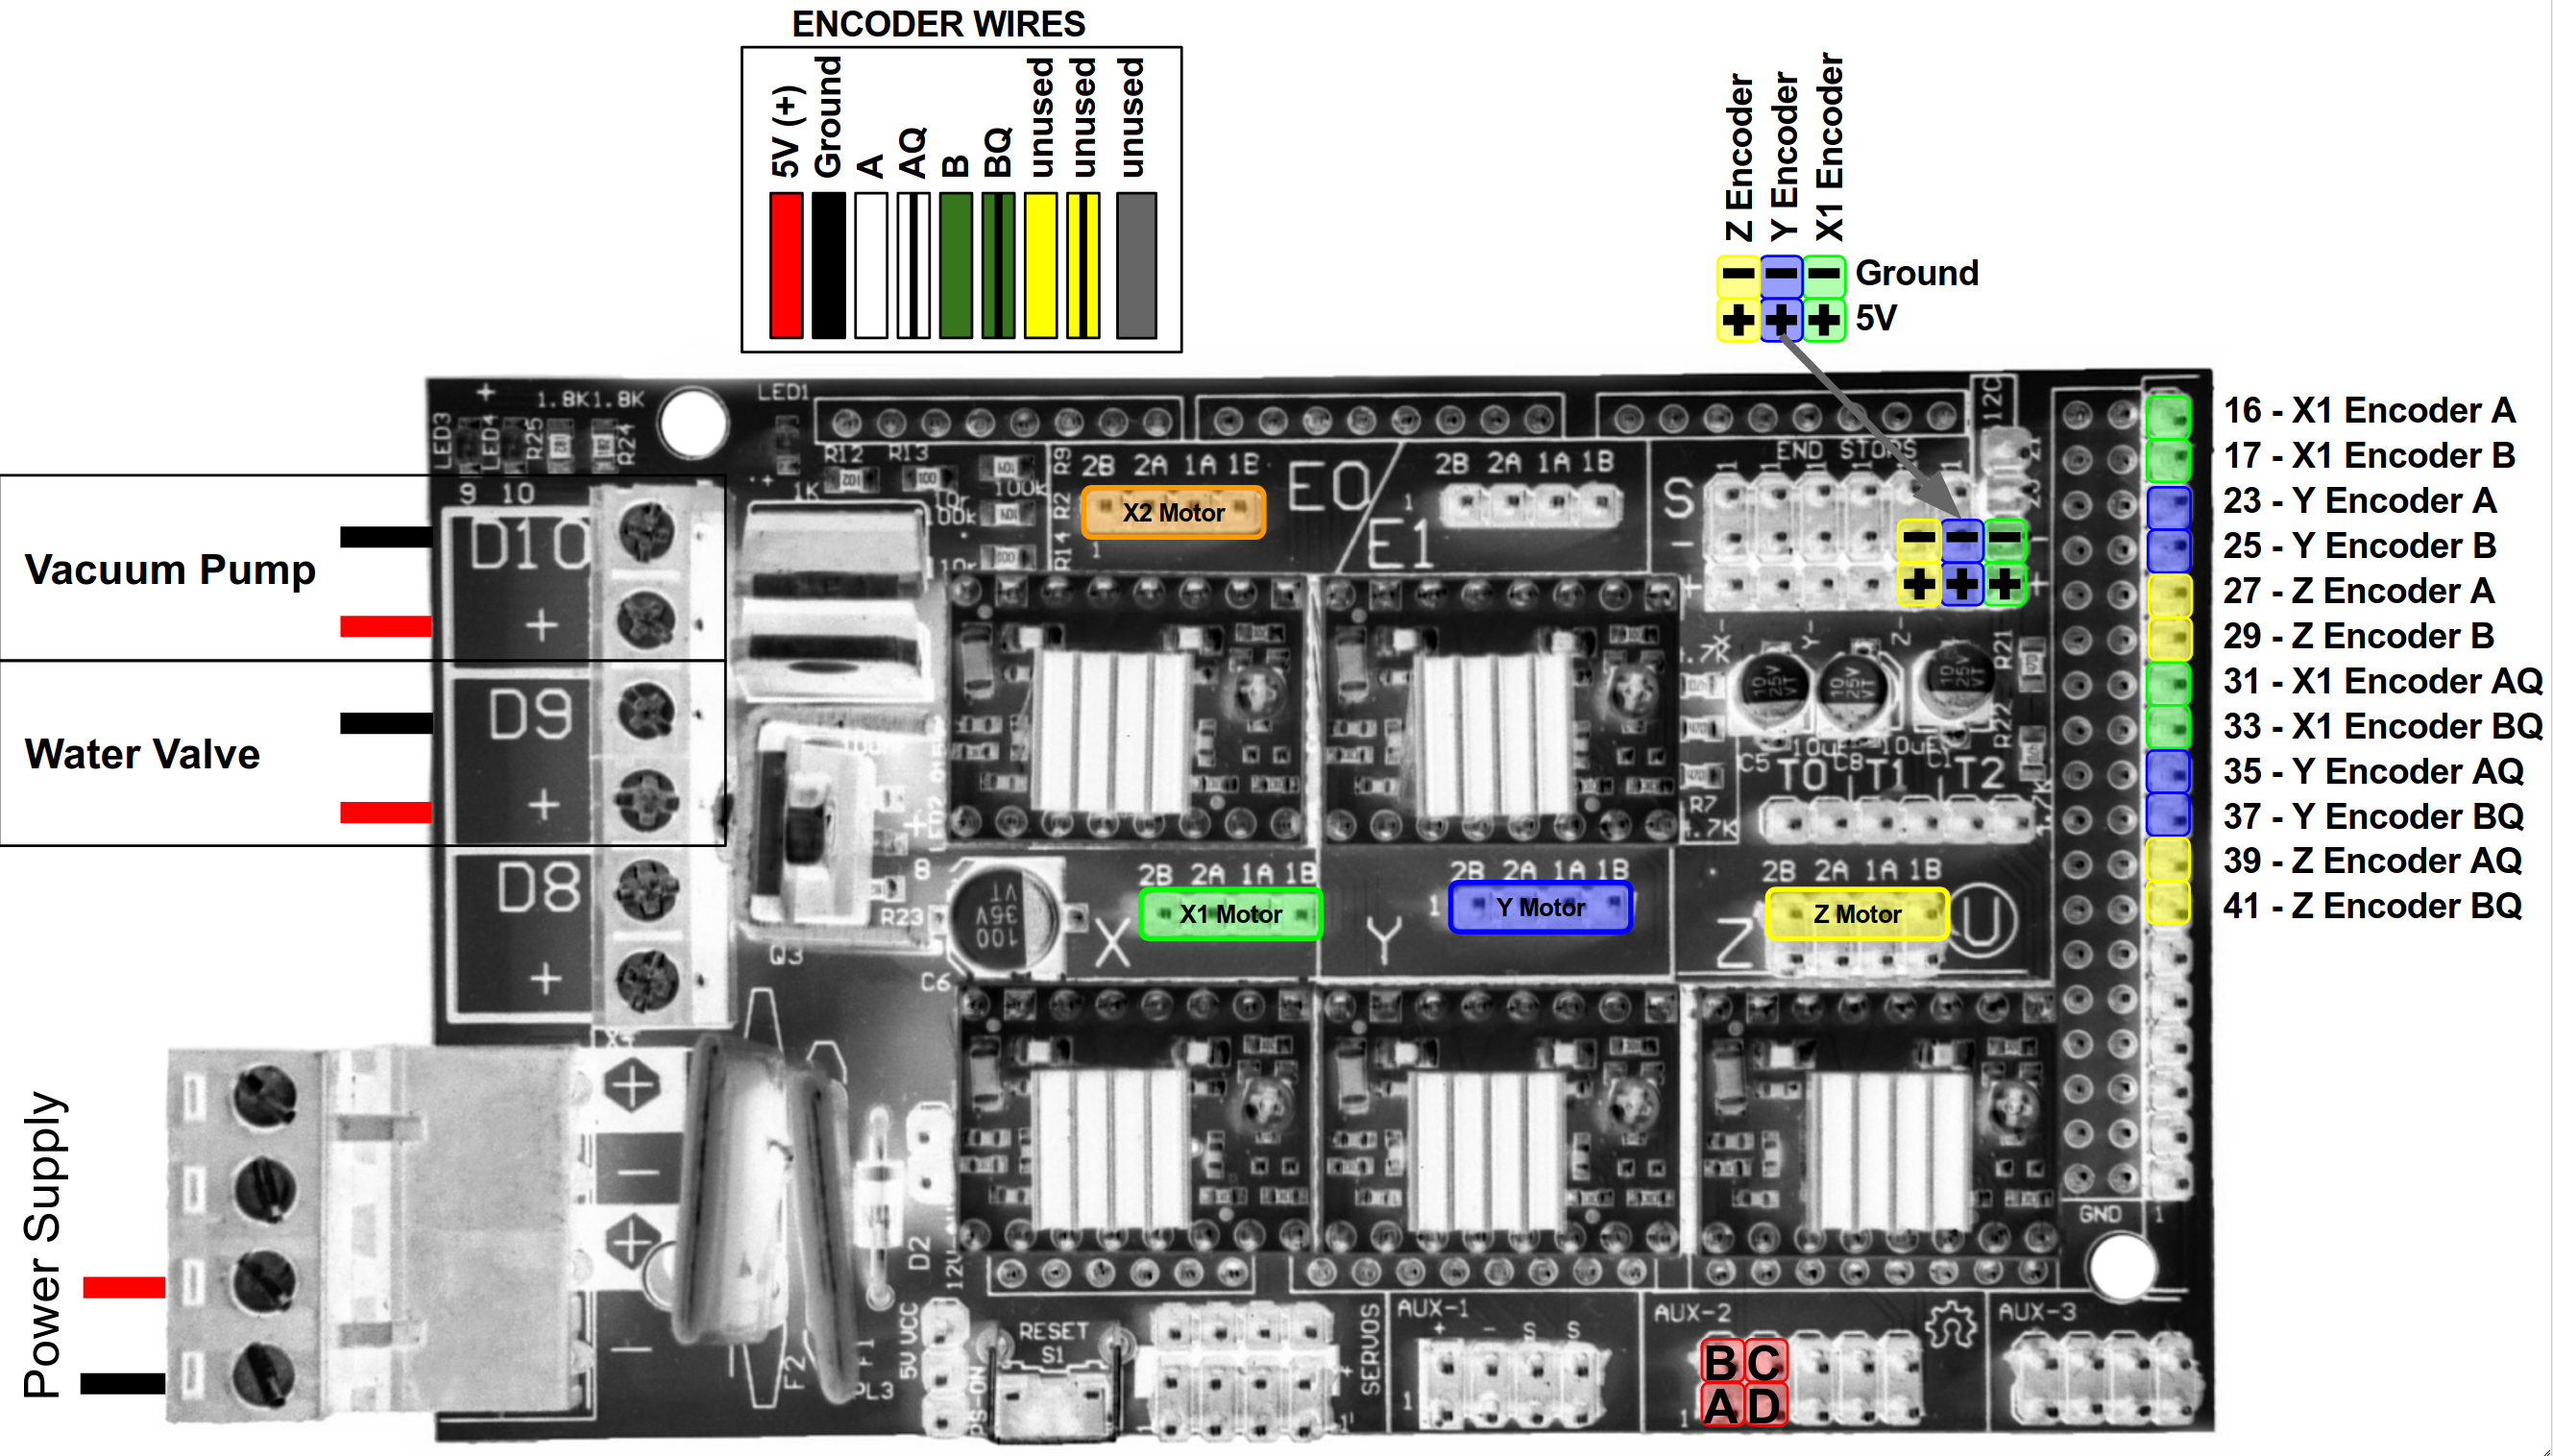
Farmbot Rotatory Encoders

ramps 1.4 wiring Google Search Electronics projects, Technology, Arduino
Ramps 1 6 Wiring Diagram Style Guru Fashion, Glitz, Glamour, Style unplugged

Ramps 1.6 Wiring Diagram For Your Needs
RAMPS 1.4, 1.5 or 1.6 Board RobotDigg
RAMPS 1.4, 1.5 or 1.6 Board RobotDigg
Week 16


Chinese Ramps 1.6 V1 Engineering
Ramps 1 6 Wiring Diagram Search Best 4K Wallpapers


[RK_2290] Wiring Ramps 1 4 Download Diagram
Ramps 1 6 Wiring Diagram Search Best 4K Wallpapers

Ramps 1 6 Wiring Diagram Search Best 4K Wallpapers